I'm back with a tutorial on how to make your own pine cone zinnias! They are super simple to make with one exception. Pine cones are hard to cut! So as I was saying in my last post, I knew that I was going to try to make some of these pine cone flowers after I saw some last year. But I didn't get around to making them until this past June. One of our granddaughters was visiting us and I thought this would be a good project for us to work on together. Little did I know that they would be so hard to cut but once we figured out how to do it, they were a breeze to make.
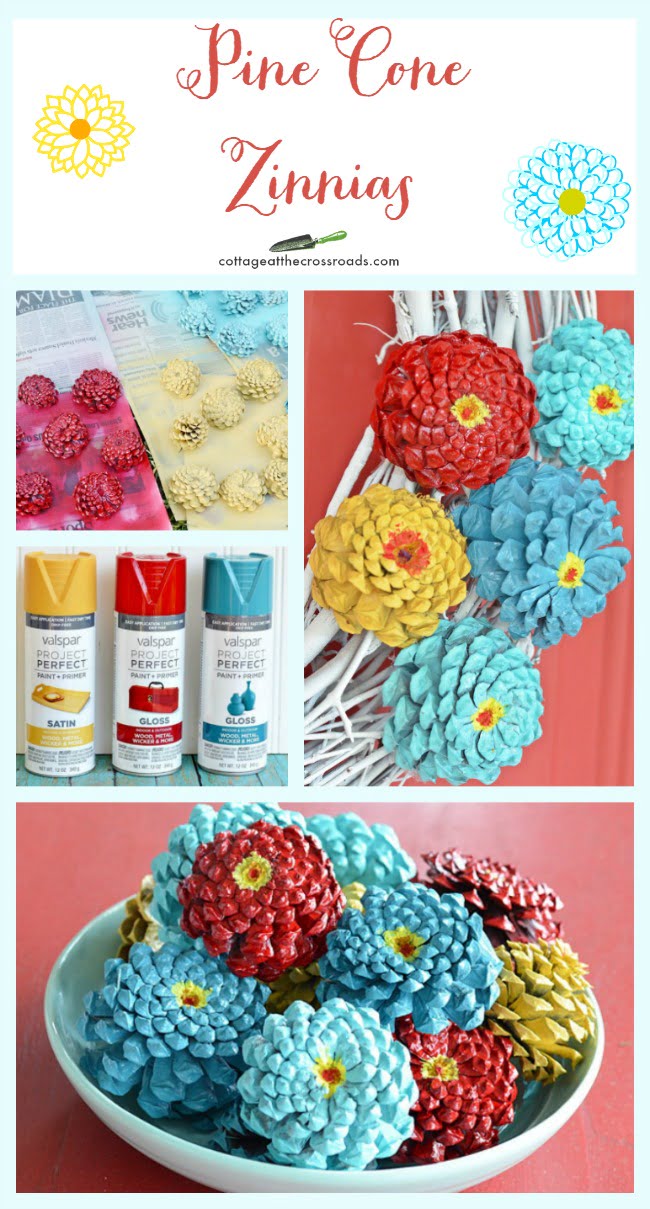
How to make your own pine cone zinnias
Step 1
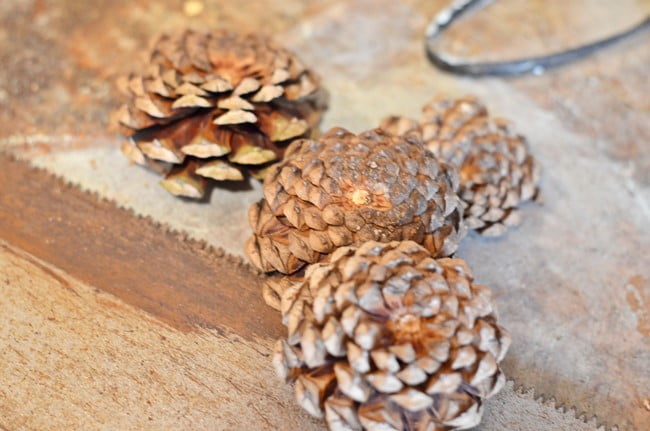
To make the flowers, you have to cut off about ⅔ of the pine cone, and you will only be using the BOTTOM of the cone to make the zinnias. First I tried a really sharp knife to make the cuts. Then I got out a hack saw. I wasn't getting anywhere and was just smushing the cones that I was trying to cut. I realized that I needed something to hold and secure the cone while cutting it. So I asked Leo for a little assistance.
Step 2
Leo has a vise on a stand in his workshop so we clamped a cone into it. And he thought his handheld high-speed grinder would make the cut.
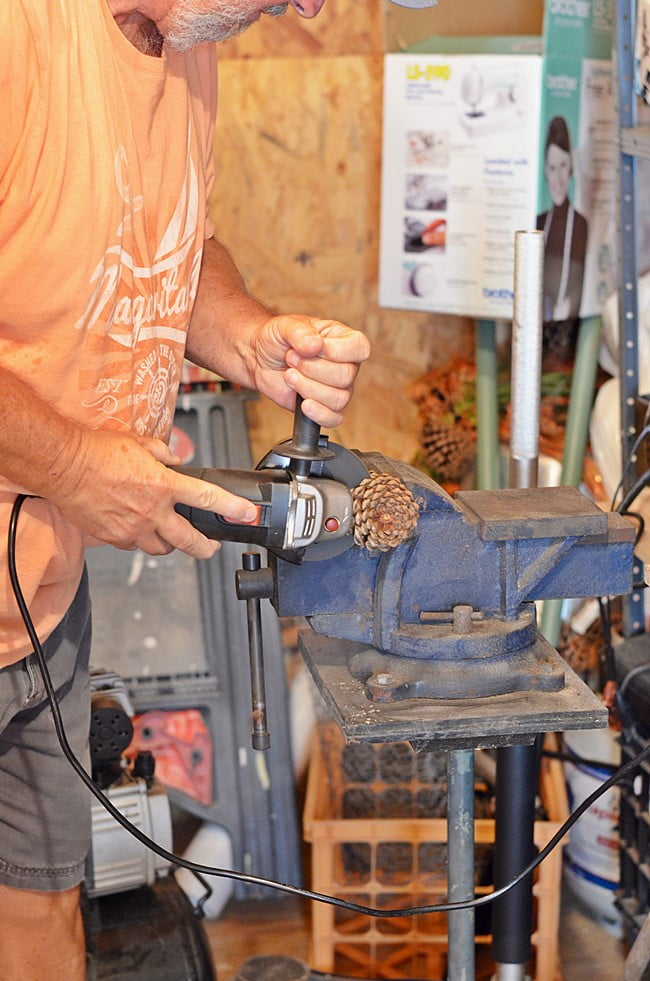
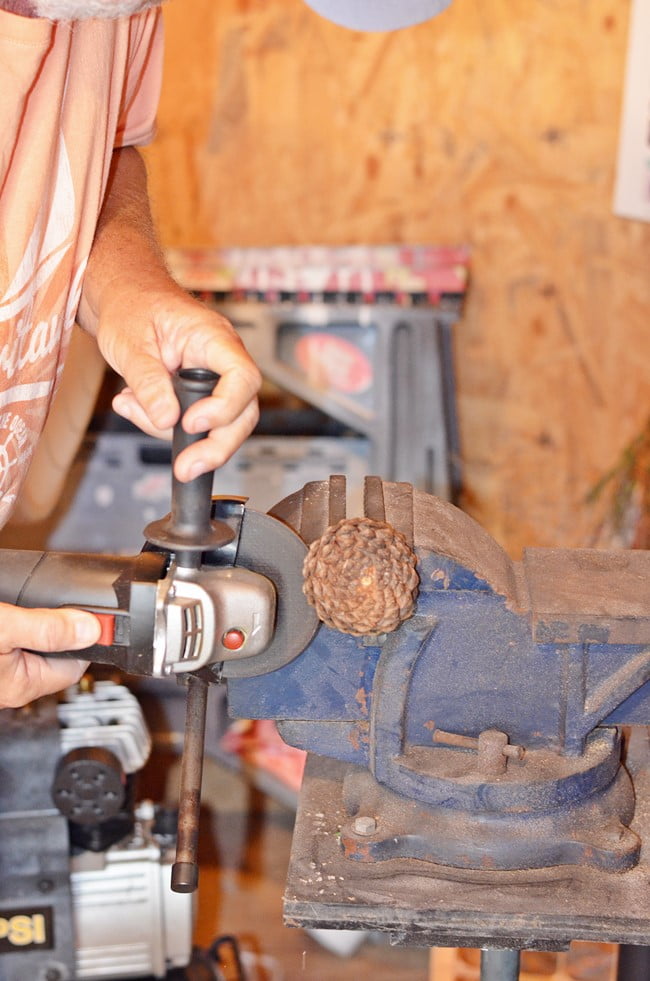
In this photo, you can see the wheel of the grinder just a bit better but it really did the trick! Of course, if you try this yourself, follow all safety precautions and wear eye protection. We did have to stop from time to time because the air was getting a little smokey since we were cutting wood. So make sure you have good ventilation as well!
I was thinking that if a person did not have a grinder that a small, hand-held saw like this that I found on Amazon would work as well.
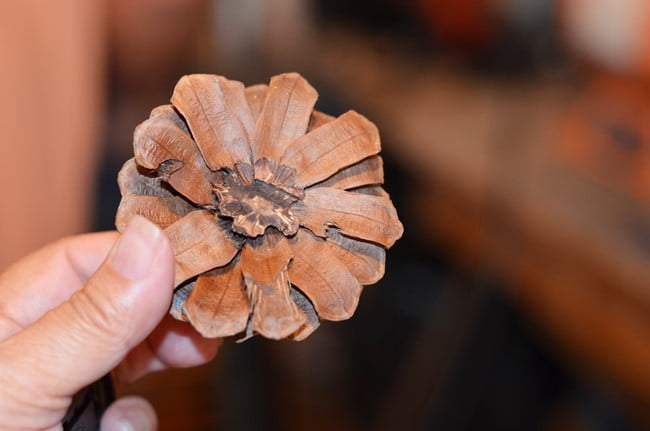
This is what a cut pine cone looks like, and it didn't take too long to cut a whole bunch of them!
Step 3
The next day I spread the cut pine cones out on newspapers and spray painted them.
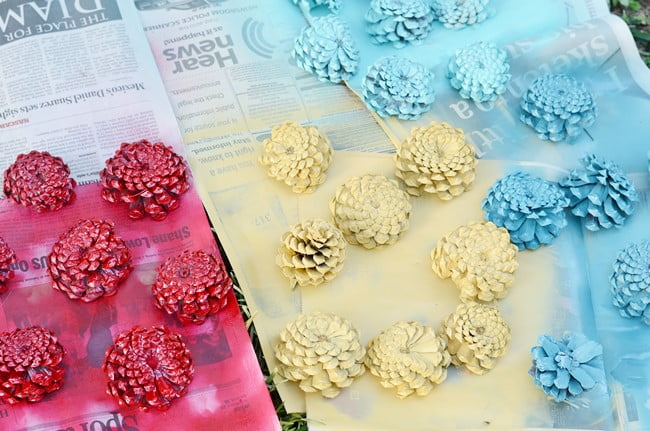
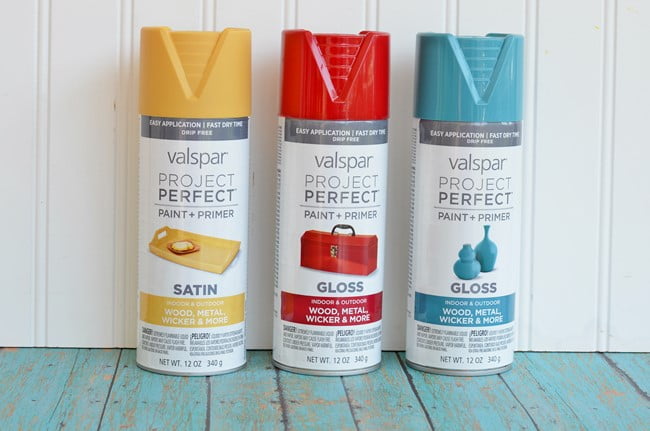
The colors I used were: Afternoon Stroll, Cut Ruby, Tropical Oasis, and the one not pictured was Nautical by Valspar also.
Step 4
All that was left to do once the paint dried was to create some centers of the zinnias by using a little craft paint. The pine cone zinnias look so pretty gathered in a bowl or on a wreath as I used them.
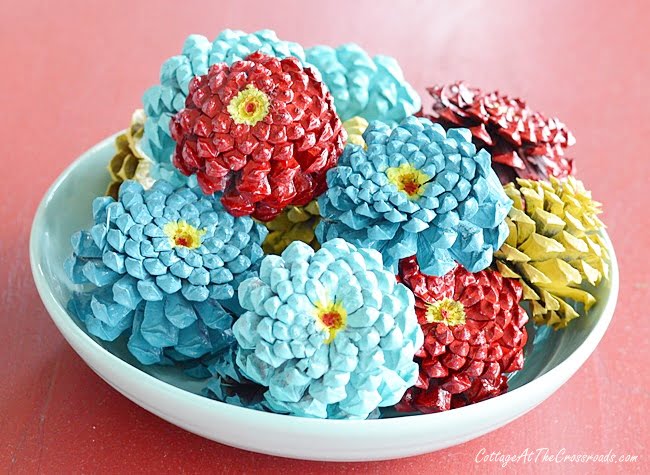
Oh, and by the way, Ruby, our granddaughter, learned some new words and names of tools while we did this project!

Mary Wasley
I love this idea and will probably tackle it after Christmas. Did you dry the pine cones in the oven first? Thanks!
Cristina Peralta
Que hermoso!!! Amó las piñas gracias por compartir sus conocimientos..
Moises Brigham
The guide is clear and bright, without any added
worthless details or else. The speech is equally brilliant and vivid, so the more
I read, the more I do like it!
Jennifer
When I put mine outside all of them closed completely and after 2 coats of paint I also sprayed them with a semi-gloss coat. Any comment will be greatly appreciated. Thanks
Jane Windham
Jennifer, I have never had that to happen when I've spray painted pine cones. The only thing that I can think of is that you may have applied too much paint at one time. I would suggest doing several light coats and letting each coat dry thoroughly before adding another.
Trey
You did a fantastic job! This post seem quite nice.
AMY JANIK
Love your pine cone zinnias! Have been wanting to do this for awhile, and have all my cones collected. Question is about how you attach your cones to sticks to make a floral arrangement? Do you just hot glue?
Thanks for the tutorial!
Lee Hernandez
I’m sorry, but I just had to laugh when you said your grand daughter learned some new words while making this project. I so often have to bite my lip when I’m around my grandkids because of a “mistake ‘ with a hot glue gun or a stray hammer. I don’t want them to learn an inappropriate word from me!
Lora
My thoughts exactly, too funny and human.
Patti Liszka
How did you attach the pinecones to the wreath or to sticks? What type of wreath?
Jane Windham
Patti, most of the time I hot glue to flowers onto a wreath. But if the wreath is going to hang in the sun, then you can attach the flowers using floral wire.
Luanne Gilbert
I am wondering which type of pine cone to use. Can you show me a picture of one before you cut it?
Linda
These are lovely. Can you tell me how you would attach them to a wreath frame, if you've ever done that?
Thank you for the tutorial.
Linda
Lorraine
I tried snippers, then a saber saw to no avail! LoL google to the rescue and found your blog. Had a vice grip already on the work bench and hubby used his dremel multi tool thingy with a saw blade on it. Worked perfect!
Mary Scheck
Just saw this on pinterest ,luv it my daughter in law was looking for directions to make pinecone flowers and u popped up. Beautiful zinnias can't wait to get started! Thank you for this greatly appreciated, Mary. From Wisconsin, where pinecones just fall off the trees! ! ! !
Ellen
Wow, I'm doing these with my granddaughter's! Found another way to cut the cones. A branch cutter! Very simple walked around the yard cutting them. Wish I could post a pic...
Jane Windham
You're right, Ellen. A branch cutter works perfectly! My friend discovered that after we posted this project. Have fun making these with your granddaughters.
Mary
Thanks for sharing your idea. I found that I could "nip off" the pointed end of the pine cone. Then I was left with just the core of the cone which was easily cut off with garden clippers.
Orly
Hi please can you tell me how did you nip off the pointed end of the pine cone, I couldn’t and my hand hurts.
Jane Windham
We used a grinder but you can also use loppers (long handled branch cutters.)
Kathi
I love the look of the "zinnia's" when they are finished. My husband has that vise and saw to cut them I believe so hopefully, I can get some cut. I would like to make a wreath of them using fall colors for the door and then some here in the house as well. Wonderful idea. Can't wait to see more ideas.
Judy
Such a clever and cute idea. They really look just like zinnias! I just finished making some acorns with plastic Easter eggs and pinecones and used mostly the tops because the bottoms were so tight. I didn't throw them out yet as I thought I might figure out a way to use them in another project and now that I've seen your zinnias they'll be perfect for it. Thanks for sharing.
Myra
Jane,
I LOVE your Zinnia's. They are so pretty and look so real. I have tried cutting pine cones with a sharp pair of nippers and they just pinched the cones too much. We have the tools your husband used and will try your method. I am trying to make a wreath using fall colors, Oranges, deep red, yellows, etc.. Thank you for posting such a detailed post of how to cut and paint the pinecones.
Lisa
I would never have guessed these were pinecones! They are beautiful!
Kim Nichols
Jane, those are so cute! Another great use for pine cones.
Carol Roddy
Thanks for sharing. They really turned out nice. One question I noticed that the paint(s) that you used have different finishes, gloss and satin. Does it make a difference? If you use them on a wreath or somewhere that might get some exposure to elements, would you use a protective finish? Thanks again, love your wonderful ideas!!
Jane Windham
Carol, when I first tried painting the pine cones, I used a flat acrylic paint and I didn't like that. So I selected gloss and satin finishes when I was buying my spray paint. I would have painted them all with a gloss paint but some of the colors that I wanted were only available in a stain finish. If your wreath is going to get wet, I would spray the flowers with polyurethane after painting them.
Barb
That is a great idea. We have pine cones each year from our evergreens. Thanks for the tutorial.
Jane Windham
Just think! They are all potential flowers!
Shirley@Housepitality Designs
Thanks for the tutorial...these are so amazingly beautiful!
Jane Windham
Isn't it just amazing how the bottom of the pine cone looks so much like a zinnia flower?
Katherines Corner
this is such a clever idea. They look lovely in the bowl and on the wreath. Hugs P.S. pinned!
Jane Windham
Thanks so much for pinning!
Debrashoppeno5
These are fantastic. I try to grow them but they do not do well in the hot Florida sun. Now I can have beautiful zinnia's all year long.
Jane Windham
Zinnias are my favorites, too! I grow them in SC but I have found that they do not like overhead watering. It creates a condition called "Rust" making the leaves all speckled and ugly. So I drag a hose out to water them!
Beverly
What a beautiful display! The pine cones look lovely and the colors you chose are great. This is going on my to make list. Thanks for the tips about how to cut them.
Jane Windham
Thanks so much, Beverly! I am loving these colors and will continue to use them on the porch this fall!
Nancie
Thanks for the tutorial, Jane. I'm excited to make two wreaths for my front doors in fall colors. Thanks for sharing!
Jane Windham
Please send a photo of your wreaths when you get them made, Nancie!
Madonna
I have gathered pine ones and can't wait to start. Your pine zinnias are beautiful.
Jane Windham
Thanks a bunch, Madonna! Good luck with your pine cone project!
Liz @ Infuse With Liz
What a cute idea Jane! Those are some tough pinecones! Love the colors you chose for them- very cheerful!
Jane Windham
Liz, I am really loving the red and turquoise combination right now! I have lots more to do on the front porch and will show it all soon!
Mary
Your pine cone zinnias are adorable Jane! I pinned some last year but never got around to making them either. Your colors are so vibrant and I love the yellow centers. Thanks for the tip on how to cut them. Hope you're staying cool this summer 🙂
Jane Windham
Mary, it has been so darn hot for so long this summer, hasn't it?
Dawn
Jane this is the most brilliant idea ever 🙂 I'm a zinnia girl too and your project just make me happy looking at it.
Jane Windham
It is just remarkable how much those pine cone bottoms really look like zinnias, don't they?