This easy-to-make wooden obelisk will look really nice in your garden. First of all, I must tell you that I am by no means a professional carpenter or woodworker. So if I can build this, you can too. I'm including step-by-step directions and a diagram so that you can make one too at very little cost.
How to make your own DIY Wooden Garden Obelisk

Back in January, I was browsing through the How-To books in Lowe's and spotted an obelisk. I had seen these around but had no idea it had such a fancy name. By definition, an obelisk is a tall, 4 sided, narrow, tapering structure which ends in a pyramid-like shape at the top. I'm just going to call it a wooden trellis that you can grow things on in the garden.

What you need to build a Wooden Obelisk
As I mentioned earlier, if I can build this wooden obelisk, I'm confident you can.
- four 2"x 2"x 8' pieces of treated wood
- three 2"x 1"x 8' pieces of treated wood
- 1 small box of 2" coated deck screws
- drill and bit
- power or hand saw
- tape measure
- pencil
- a long work bench or 2 sawbucks

How to build a Wooden Obelisk
Learn how to build this garden wood obelisk with my step-by-step instructions, detailed pictures, and printable diagram.
Step 1
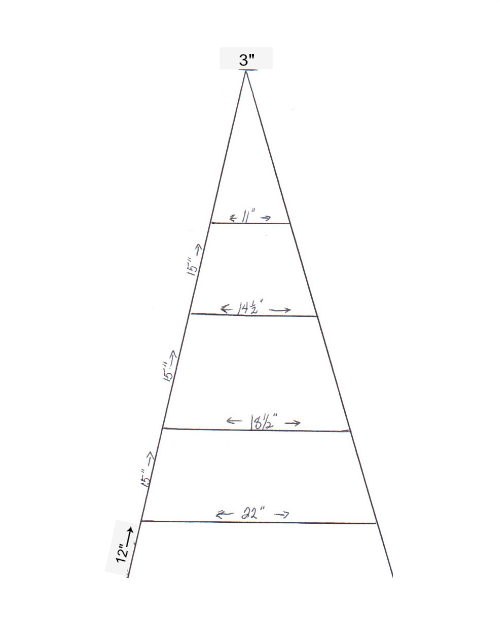
Cut the 2"x 1" slats into the following lengths:
- four 22" pieces
- four 18 ½" pieces
- four 14 ½" pieces
- four 11" pieces
Step 2
Drill a small hole ½ inch from both ends of each piece. This will keep the wood from splitting when you insert the screws later.
Step 3
Lay down two of the 2"x 2"x 8' pieces on your work space, placing them into a pyramid shape.
Step 4
Screwing the 12" slats from the bottom to the top of the obelisk.
- Screw a 22" slat 12 inches up from the bottom on both sides
- Screw a 18 ½" slat up 15 inches up from where you put the first slat.
- Screw a 14 ½" will go up 15 inches from that one
- Screw a 11" slat will go up 15 inches also.
I think you get the idea. The first slat is 12" from the bottom and the remaining slats are spaced 15" apart.
Repeat the process and build one more just like it.
Save the diagram here.

Important Tip
While you're screwing in these side slats, it's important to have someone hold the top of the pyramid together.
Step 5
After you have two sides, stand them up, have someone hold the tops together, and screw in the remaining slats. You will now have a 4 sided structure.

Step 6
To finish off the top, I chose to just trim it out with four small pieces of the 2"x 1" slats. I put this old birdhouse on the top just to get an idea of what I wanted to do. You may want to put a decorative finial on the top, but we're going to put birdhouses on the top of ours.
Obelisk Variations
As you can see in this photo, I experimented with different ways to make the obelisk more sturdy. I doubled the 2"x 2"s and later I built another one using 2" x4"s. But really the 2"x 2"s work just fine.

Painting our Obelisks
You may choose to leave them a natural wood color, but we decided to paint ours to add some more color to the garden.

First, we put a coat of a good quality exterior latex primer on them. After all, I don't want to have to be painting these things every year since painting is one of my least favorite things.

We chose to paint them what has become Cottage at the Crossroads signature shade of green (Bella Mint by Valspar.) We've painted our Adirondack chairs, an arbor, picnic table, and some exterior doors this same shade of green. I'm planning on planting an indeterminate cherry tomato under this one because they can get very tall.

I got a little carried away and built four obelisks and had to decide where to place them in the garden. I think we'll plant some pole beans under two of them and perhaps a flowering vine under one. I'll leave that monumental decision up to my full time decorator, Jane!

This year, we're concentrating on not only having a fully productive vegetable garden but an attractive sanctuary as well. You know, a place to enjoy the great outdoors with a glass of wine.

You may want to choose how you're going to anchor the obelisk. I bought some stakes at Lowe's. Jane and I are now shopping for some attractive birdhouses. Stay tuned to this blog to see the finished product which will include the birdhouses and the climbing plants.
If you decide to build an obelisk, let me know how it turns out.
Update: This post has been updated to correct a mistake made in the original materials list. We apologize for any inconvenience.


Sonia
They look fantastic. Thanks for posting instructions. I'll be making one soon!
Denise
Had bookmarked your site almost a year ago and just went back to it today. My husband loves your plans and we're heading to Lowe's/Menard's this afternoon to buy supplies for a 10 ft obelisk for my clematis to grow on around our martin house. Other trellises we've tried to purchase have been too short, too easy to tip over (my clematis vines have done well since the tornado destroyed our home & yard 2 years ago). Will let you know how it turns out! Thank you for the DIY directions and photos.
Elizabeth Agler
I realize this is an old post, but I wanted to say thank you! My 12 year old son and I followed these directions for a wonderful obelisk that we painted purple and nailed a propeller at the top- I couldn’t be happier. The instructions were super easy and straightforward! I wish I could post a picture but I need instructions for that too!! Thanks again!
Jane Windham
That is so kind of you to come back and leave your comment, Elizabeth. Putting a propeller on top is a great idea and I do wish I could see a photo of it!
Valena
I so enjoyed reading the garden obelisk posting.
Valena
Jordan
As noted by others below, you'll need more than 2 boards for the rungs. Also, the upper two rungs probably need to move up the ladder a bit to for just right. I cut my height at 6ft and put 8" rungs at the top.
Antonetta Kowalewski
Im sure you can build it too guys. Just look for woodprix page
Bonnie
This pattern is great and super easy! I made 3 tonight for my climbing plants. I adjusted the pattern for the smaller ones as we built an 8', 6' and 4'....they turned out perfect!! I also used pressure treated wood as they'll be covered in vine - so a little extra cost but not too steep. Thanks for sharing the pattern and pics! 🙂
Lois
Absolutely love these and I am pinning them to show my husband! Already thinking about where to put mine before they are already built. Thanks for sharing such lovely pics. Love your home and farm.
Kirsti
So inspired, and looking forwars to make these wooden obelisks for my garden her in Norway. Great to get detailed DIY instructions. Guess i will not see the same abundance of flowers You get, in"my" climate, but still...
Sheree
I love your Obelisks! So much so that I am building two of them tonight. I love your plans - very straight forward, very easy to build. But I have a question: Unless I missed something, the horizontal cross supports compbined, total 264 inches. In the instructions, it states that I only needed 2 -1" x 2" x 8' long pressure treated wood to build one Obelisk. Two 8' long pieces totals only 192". Fortunately for me, I have a pile of scrape - enough to cut the 4 - 14.5" and 4 - 11" pieces. Am I not thinking straight?
Kathy
I love this project and appreciate the detailed instructions, diagram and wonderful pics. I noticed your comment about anchoring the garden obelisk, but I would love some additional info on how to do that. We get some ferocious thunderstorms and would hate to find it in my neighbor's yard after a big wind. Thank you again, Kathy
Leo Windham
Hi Kathy,
I bought two foot metal stakes at Lowes. The stakes have a hole in them Kind of like a sewing needle. I used clothes line wire to tie to the obelisk after I drove them into the ground. So far they haven't blown over. Thanks for stopping by the Crossroads.
Sheree
I am in the process of building 2 of Leo's Obelisks. To anchor them so they don't blow over (we get heavy storms in Florida), I am setting each leg in a Folgers Coffee container - plastic, and then filling each container with concrete. I will then set them into the ground. A bag of Quickcrete is only about $3.00 and containers are free. Well worth not having my Obelisks blow over! Hope this helps.
Anne@designdreams
Oh I love these Jane & Leo!!! Thanks for the tutorial!
Martin Peach
Have just discovered your website while researching obelisks for my newly designed garden. Am most grateful for your directions and diagram. Haven't got to the build yet, but like Mike Baker, I found at the planning stage that your two 2" x 1" timbers need in fact to be 11 feet in length and not 8 feet as per your directions. I shall now order the wood to build two obelisks, one for winter/spring clematis, the other summer varieties. Both will also support roses.
Best wishes
Martin Peach
Surrey, England
Susan Currie
Just love it, I have large flower gardens and am running out of places to put my climbers, now I know what I will do thanks for the easy instructions keep up the good work.
Mike Baker
Thanks for inspiring me to do this project. I am not quite finished, but wanted to let you know your list is off by one 1x2. I got the four 2x2's and two 1x2 painted and was getting ready to cut the 1x2's to assemble the Trellis and realized that I did not have enough.
Just thought you would want to know.
Yours look great and I like your site.
Mike
Leo Windham
Thank you Mike. I'll make that correction.
Mrs Major Hoff (Sara)
Great instructions, thanks! I love obelisks!
Pamela S. Scruggs
my 19 year old cat went to glory this morning and I was looking at home talk to get my mind off of it and came across your blog I think it is only fitting that I will build an obelisk in my garden in honor of Lillian. I truly believe that the Lord puts things in your path for a reason thank you for the step-by-step instructions I'm going to use this day to do this project and it will soothe my soul to have a forever memory piece in my garden in honor of my furry friend.
Anika Ferguson
I have been collecting and repainting eclectic bird houses and wishing I had trees or a good place to our them! I am definitely making one or two of these for the garden! Thank you!
Mona
Hi..
Your garden is so gorgeous!! and I love the obelisks... I really, really love your garden area...so I am now following you so I can keep up...
Love, Mona
I am an avid gardener too so this is right up my alley...
Mary
Oh I love the green color of your obelisks and the bird house perched on top! Gardening with a glass of wine in hand is my kind of gardening 🙂
Allie
I ,being a woman alone am going to build one of these for sunflower support. Thanks for posting for free..not trying to make a buck like so many others.
Linda
Thank you so much for these easy to follow instructions. Our local OSH store has some obelisks that are selling for $60 - $80 and they are not even as tall as yours! Also, great idea putting bird houses on top.
Jean Windham
Leo, you are becoming a real handyman down there in Windham's Crossroads. I think the obelisks (wooden trellis) are really pretty and add alot to the beauty of the garden. Great job. Now you keep up the good work. Jean
tonia conner
I love your garden place period. We are just starting ours. I would like some raised beds. and the obelisks would look great in between for beans and maybe squash? I'm looking for directions for the beds now. If I get the obelisks done this year I will post and tell where I got the directions. In fact I would like to go ahead and have you share it on my blog if I can figure out how to do it. If it's alright with you. Or does that have to be done on your end. Just please get back with me.
Blessings,
T.
Donnamae
Loving these! It's going to look lovely when it's all planted! 😉
Shirley@Housepitality Designs
They are not only functional but beautiful Leo!!...Love the color!!
Ann
These are the perfect touch to your amazing garden. Love the green!
Cheryl
Thank you for your easy to understand directions. I think I can do it! Love your blog!!
SheilaG @ Plum Doodles
Wow, those are great! I think that just maybe, even I could build one. I envy your garden, and especially the energy to maintain it. Your obelisks will look wonderful strung with lights come Christmas time. 🙂
Dawn
It's just perfect and I love the bright green color you chose. I can't wait to see it when your garden is in full bloom.
Teresa
Very cool, it's so nice to see people still building their own things rather than buying from the big box stores. Well done!
Dolly Sarrio
Leo,
I love those. I'm sure I'll see them when I pass by. For those of you that don't have the chance to see Jane and Leo's place it is so cute! I love everything about it. They both have green thumbs. Can't wait to see these. Good Job!