Hi everyone! You may have noticed these flower baskets that are mounted on top of wooden posts in some of our photos, but I don't think I've ever given any directions on how you can create these yourself.
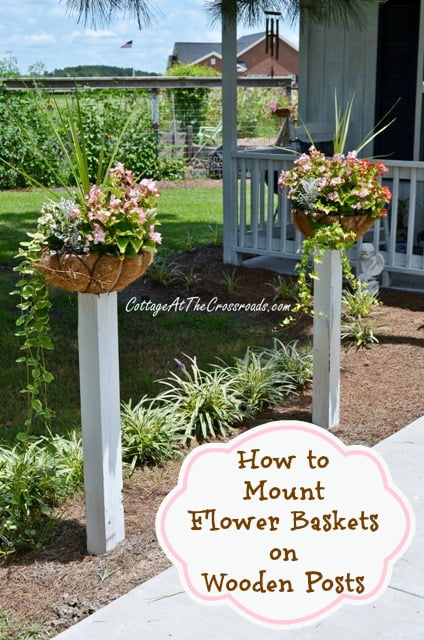
We put these baskets on wooden posts to line the sidewalk leading to my mother's apartment that is in our backyard.
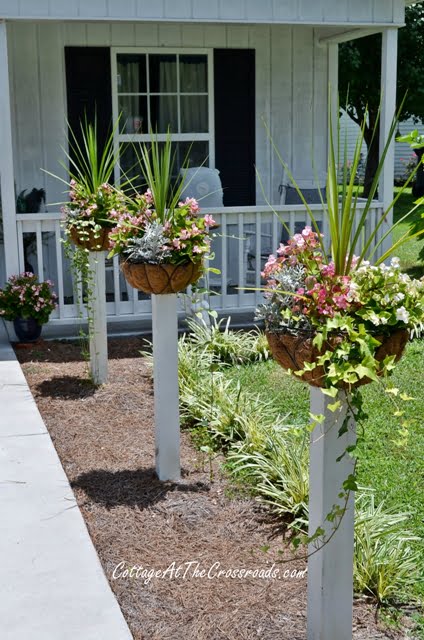
That was over 3 years ago before we started this blog so I don't have any pictures of us actually making these. But I'll do my best to tell you how we did them.
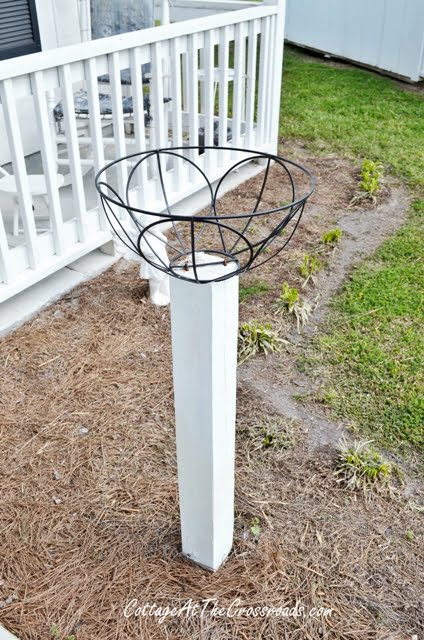
Leo started by purchasing 3 eight foot long treated wood 4x4s and then he cut them in half. Then he dug holes with post hole diggers about a foot deep. He added some Quikrete, water, and the posts and let the set overnight. Because he couldn't be entirely accurate about the height of each post when he was doing this, he waited until they were entirely set and cut them all off at the same height with the chain saw. Then he secured the metal flower baskets to the top of the posts with U-shaped nails (I don't know what to call those things but you can see them in the picture!)
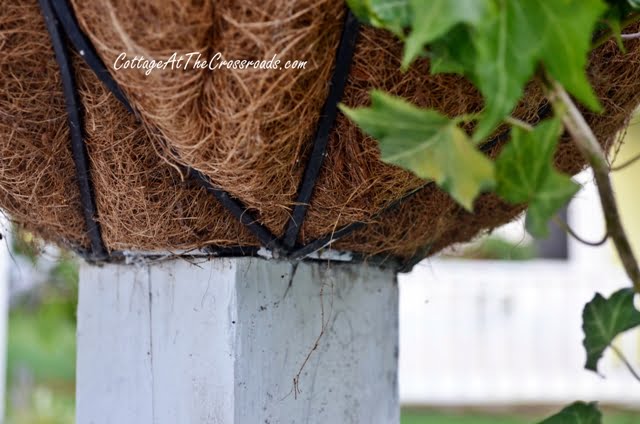
They have worked very well over the past 3 years because the metal baskets have not moved even in high winds.
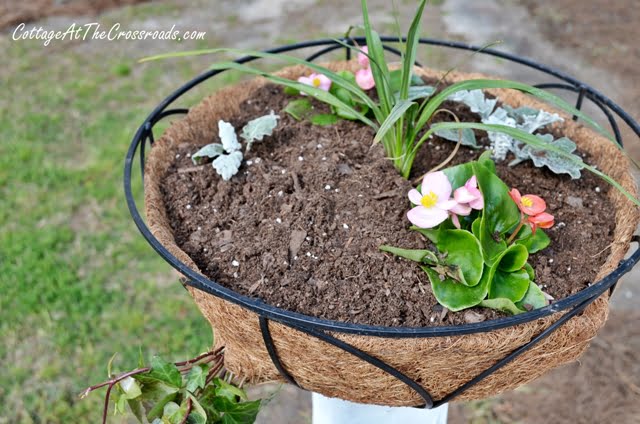
Each spring I replace the basket liners and put in new potting soil when I'm getting ready to plant some flowers. I've tried all sorts of different flowers and this year I've hit on a winning combination of plants that have looked good all summer. I placed a dracaena in middle of each basket and surrounded it with begonias and dusty miller.
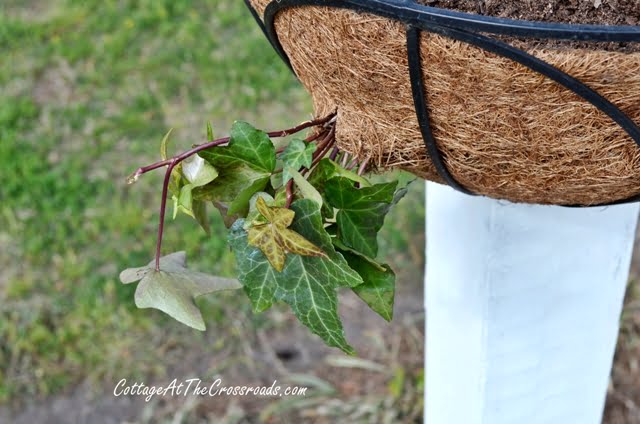
This year I tried something a little different. I cut a few holes in the basket liners and inserted some ivy and vinca.
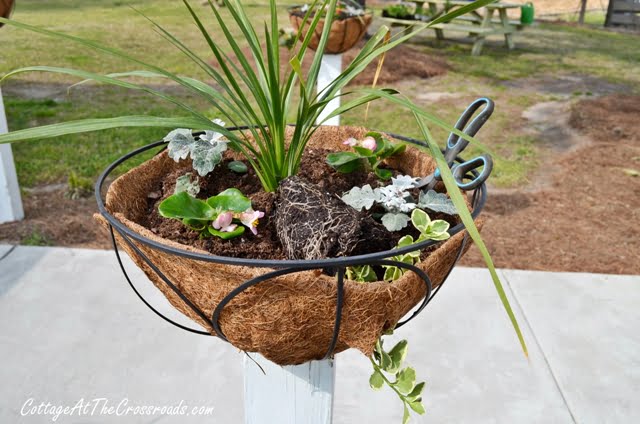
I just used my scissors to cut the holes. Here you can see where I laid the plant on its side to do this and pulled the top of the plant through the hole. Then I added more potting soil to cover the roots.
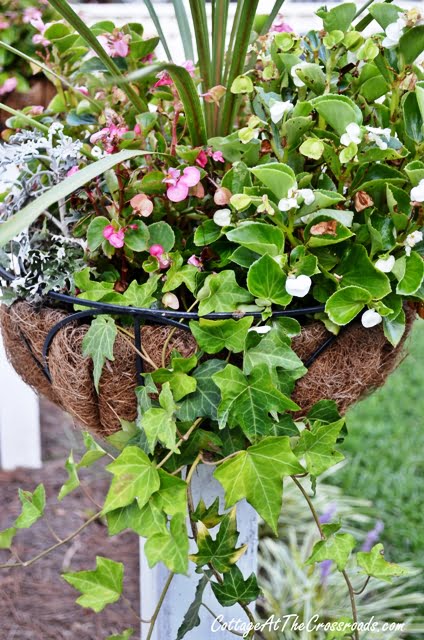
You can see how pretty the ivy looks spilling out of the side of the basket.
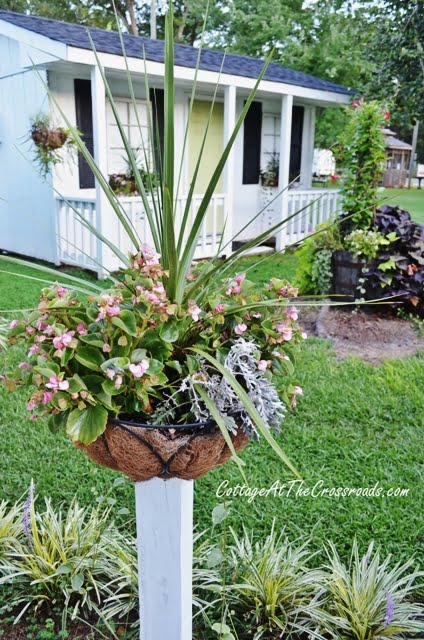
Everyone who comes to visit my mom comments on the baskets, and it gives my mother something pretty to look at when she's sitting on her front porch.
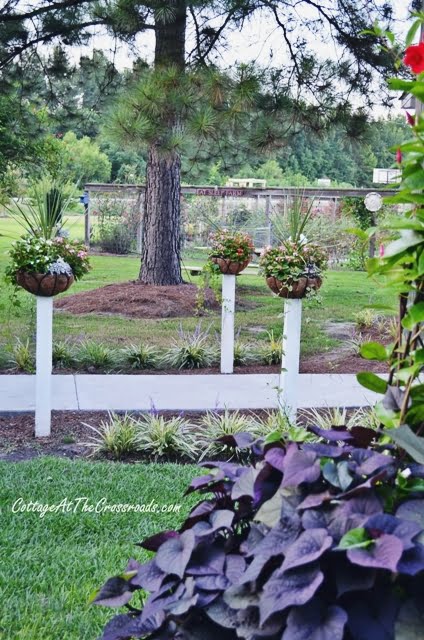
The only negative about doing something like this is that you do have to water the baskets every day in our heat. Luckily, we had a lot of rain this spring and summer and I got a break from watering!
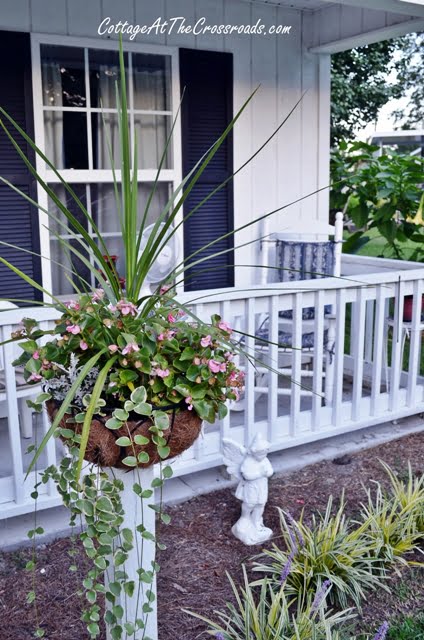
To keep the begonias from getting too "leggy" this summer, I pinched them off in July. I also trim the vinca to keep it off the soil at the bottom of the post. Vinca can become invasive and hard to control but it works just fine contained in the basket.
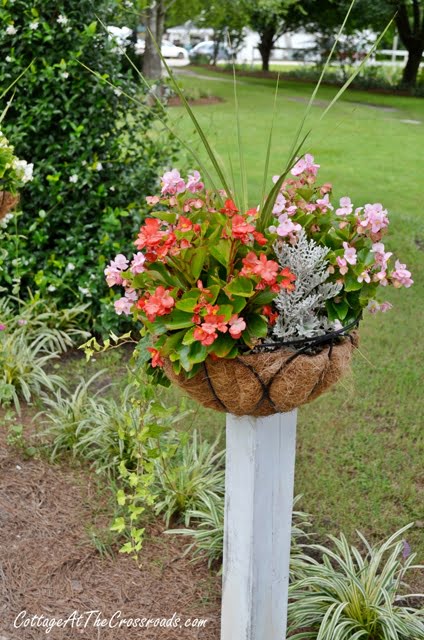
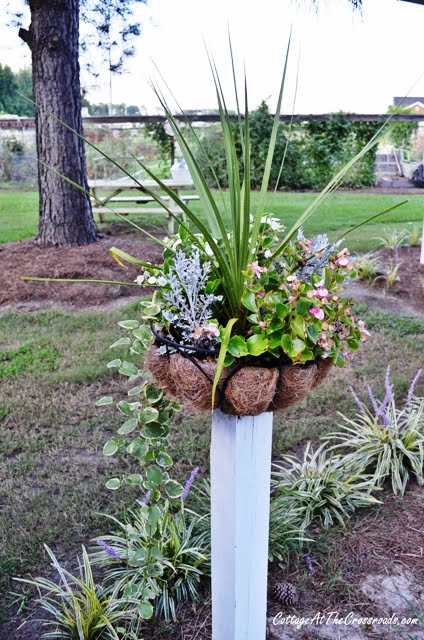
And I did fertilize the baskets in July to keep them blooming. This fall, I will pull out the begonias and dusty miller and replace them with pansies and violas which will bloom during the winter.
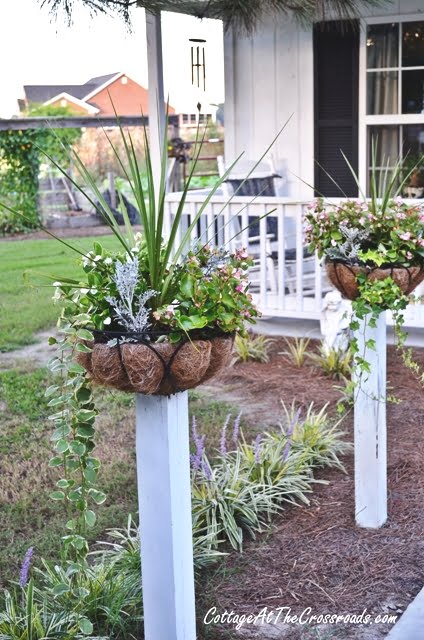
And I'm thinking about cutting more holes in the basket liner and adding more ivy. What do you think?

Kathryn Moren
I love the baskets on a post. For several years I have bought them through a Gardner catalog. They are very pricey! I have made flower pots on a pole (using small white plumber pipe) and attached to bottom of regular flower pot! Then spray painted the pipe. Thank you for sharing how you made your flower pots on a post. I had considered experimenting! Lowe’s will cut your post for you!!
Janet
How do you attach the flower pot since the white pvc pipe has a hole at the ends?
Michelle
I love this ideal! I think my hubby is going to have to make me a couple of these!
Sandy
I live this idea will do in my yard. I am presenting for Master gardeners and may I share this idea it simple to do and is so pretty.
Jane Windham
Sandy, I would be delighted if you share our idea for putting pots on wooden posts! After all, that is why we blog.
Winnie
I love this idea and have the perfect spot for this. I know you said you used treated posts,but how long will they last before the posts rot at ground level?
Pat
To lesson watering trips, place a layer of soil add a diaper, more soil, plant , water & your set. Diaper retains moisture ... Less watering needed. I do this with all my potted plants &
Vegetables in containers.
Carol
I used post anchors instead of concrete ing them in one spot. I accomplished the same look and have the ability to move them just by taking up the post anchor. These things are pricey but worth it.
Jackie
You did a great job. Lovely, cheerful look. Seems like a very doable project. Thanks for the ideas.
Ann
What a lovely idea! This is on our "to do" list for the summer, fingers crossed we get a summer 😮
Ann (in Scotland)
Jean Windham
I am so glad you did this post because I have admired them for years. So pretty and excited to find a place for them in our yard this fall. Thanks for sharing. Jean
Jean WindhMma.
I agree we all want a day to work outside in the sunshine. The baskets are so pretty in your yard. Thanks for sharing this post again this year. Jean
Ana
Hi Jane,
I have been thinking about adding planters to my fence posts since last year. In my mind I could picture how beautiful the fence would look with the planters but didn't quite know how to go about it or if the planters would look funny. You can't imagine my delight when I found my planter idea on your blog in hometalk!! I couldn't believe it! 🙂
What a beautiful job you did and thank you for posting the instructions!!! Unfortunately, I live in Massachusetts and have to wait a few months before I can do it (we just had a blizzard).
Blessings.
Pamela Bouwens-Hatkowski
The easiest way to water them would be to set up a drip watering system and even a water timer. This is the only way I can keep my potted plants alive at our cottage, since we aren't always there. Besides that, I have too many things going on to keep up!
Jane Windham
Pamela, after having come inside this afternoon from watering the flowers, I would have to agree with you that a drip system to the baskets on posts would be a good idea! It is really hot and dry in South Carolina right now, and keeping the plants watered is a daily chore.
Anna Ibarra
How beautiful, never seen anything like this. So quaint from your gardening the gorgeous yard and the little cottage home or shed. I love it all. Just lovely.
Diana from SC
I think I see a project with the 4 x 4 I pulled off a trash pile.....curbside shopping. Now to find some wire baskets that a reasonable. Thanks for sharing your ideas.
Stacey
I've always wondered how to do that! Thank you. They are beautiful and add height and drama.
Dolly Sarrio
I love those Jane!
Rosi Rossato
beautiful...
JoAnn @ SweetPepperRose
So Pretty Jane! of course everything y'all come up with is terrific. I need to thin my boarder grass this fall. It's so humid here you can cut the air with a knife - waiting for Fall for lots of things.
Atta Girl Amy
So pretty. You and Leo did a great job with these. They provide such a nice border for your walkway.
Thanks for sharing at our party.
Kelly @ Eclectically Vintage
I love everything you both do in the garden - this is gorgeous!!
K
the cape on the corner
oh yes, I quite like this idea, and I love that you have plans that will last all year. definitely show us along the way!
Megan @ Our PInteresting Family
They look so beautiful! I found you at the Monday Funday party.:)
Tammy
Hi... Stopping by to let you know you have been featured over at One More Time - Share It One More Time
Debbie-Dabble
Thanks so much for stopping by!!
Love this idea!! They look fantastic!! I have to save this one for next year....
Hugs,
Deb
Jean Windham
Yes these baskets are some of my favorite projects you have in the yard. I have admired them every time I come down to The Crossroads for a visit. I am sure your Mother is so happy they are there for to enjoy. Thanks for sharing. Jean
Tim Fulford
Nice idea...... U shaped nails area called fencing staples....... Unfortunately I suspect that these baskets will not stay on these posts once they ave established because the staples (only 2 in the picture) will pull out of the end grain, they are designed to attach across the grain really. It would have been better to put some wires across the bottom and secured to the sides of the post.
Jane Windham
Tim, now I know what to call those U-shaped staples and thanks for your tips on using them. So far they have held the baskets in place for 3 years, but when they need replacing we'll follow your advice!
vickie
These are so darn cute! I have heard of people putting sponges in the bottom of their hanging pots to hold water. I always mulch my pot plants-it sure helps. I would think dusty miller would live year round in your garden.
Tammy
Hi, Thank you so much for linking up to One More Time... I really do appreciate it...Love this idea your flowers are just beautiful!!
Tammy
Lori
An idea that I used that may help from having to water them everyday is to use a bathroom trash can liner between the coco liner and the dirt. Poke a few small holes to release any extra water. I have had pretty good success with this and it sure beats having to water everyday. Love the idea of the posts!
Tina
What a great idea! I love them . . . now . . . where can I try this at in my yard. Thanks for another wonderful gardening idea.
Betty
I love this idea. You have me sold. I have a basket like that and I will make me one for next year. Thanks so much.
the lady kay
Found this post on craft gossip...what a brilliant idea! I vote for more ivy! These are beautiful and thank you for the inspiration for my own yard!
Donnamae
I love the basket on the pole idea! And at that height, you wouldn't have to bend over to maintain them....win, win! 😉
Robyn
Excellent way to display the baskets!
If you would like help with the watering you can line the cocoanut liner with a sheet of plastic, (a black trash bag works well layed out flat) cut a few holes in it for drainage and trim the plastic off around the top edge. You still can cut holes for plants on the side of the basket.
Some other random information when you see the giant baskets along city streets they are fed with miracle grow about once a week.
Love the baskets!
Robyn
Coconut*
priscilla
These flower baskets look fabulous ! Love this idea !
Mary
Love your flowering baskets Jane~ what a great idea to add them to the posts! I know your mom must enjoy them. Your forecast is probably like ours so you have a reprieve from watering them this week too 🙂
Claudia
Some folks call the things that you attached the baskets with staples...we have always called them fence steeples. I guess it's one of those regional things.
Vickie
Yep, we call them steeples, too. They are generally used for fencing.
Love the flowers on a post idea!
Janelle
You are both such wonderful gardeners! You must make the neighbors jealous!
Shirley@Housepitality Designs
Oh my gosh Jane..those are beautiful...what a great idea!...and your mom must love seeing those beautiful flowers...and her apt looks so cute!!!...snagging a pic and sharing on FB...way too cute not to share!!!!
laurie
How clever and beautiful they are, Jane. This is such a great idea, and they make such a pretty entryway into your Mother's apartment. I love the addition of the ivy, and how smart of you to cut slits in the sides of the baskets. I would have plopped it in the dirt and waited for it to grow over the top and then come down the side of the basket. laurie
Kim
Those are so pretty, Jane.
Denise at Forest Manor
These baskets are absolutely beautiful, Jane! You're so creative and have an amazing green thumb! I met you and Leo last fall at the Southern Bloggers' Conference in Raleigh, NC. I doubt you remember me (I still have a rather small blog following). I was there with my husband, too; we sat in the back row. We weren't there for the meet and greet on Friday night, so we didn't get to socialize a lot.
I wrote about my mother-in-law's pretty garden this weekend, so I hope you'll visit me and read the post. My blog is House at Forest Manor, and my husband, son, and I live in North Carolina. I enjoy your blog a lot (e-mailed the link to my mom in fact). Hope you have a great week! 🙂
Denise